Overview
Deploying resources to the cloud through deployment pipelines requires the need to authenticate with the various cloud providers in a standardised and secure manner. GitHub Actions offers the ability to authenticate with Azure using OpenID Connect (OIDC).
In this post, I’ll guide you through the process of setting up OpenID Connect (OIDC) authentication with Azure and GitHub Actions.
What is OpenID Connect?
Open ID Connect (OIDC) is an authentication protocol built upon OAuth 2.0, that is designed to provide a secure and standardised way of verifying the identity of users, combining the capabilities of both authentication and authorization.
In simple terms, OIDC allows you to sign into one application and have access to other applications.
Why Use OIDC with GitHub Actions?
One of its key advantages is its ability to simplify the authentication process by eliminating the need to manage expiring secret keys. Instead, OIDC offers a more straightforward and secure authentication approach, and for this reason, it is generally considered to be the preferred authentication solution for connecting to the Azure cloud from GitHub Actions due to its robust security features and ease of implementation.
How Do I Set It Up?
1. First, we’ll need to create an App Registration in Azure Active Directory (AAD) through the Azure Portal. Note: Creating it through the Azure Portal will automatically create an associated Service Principal.
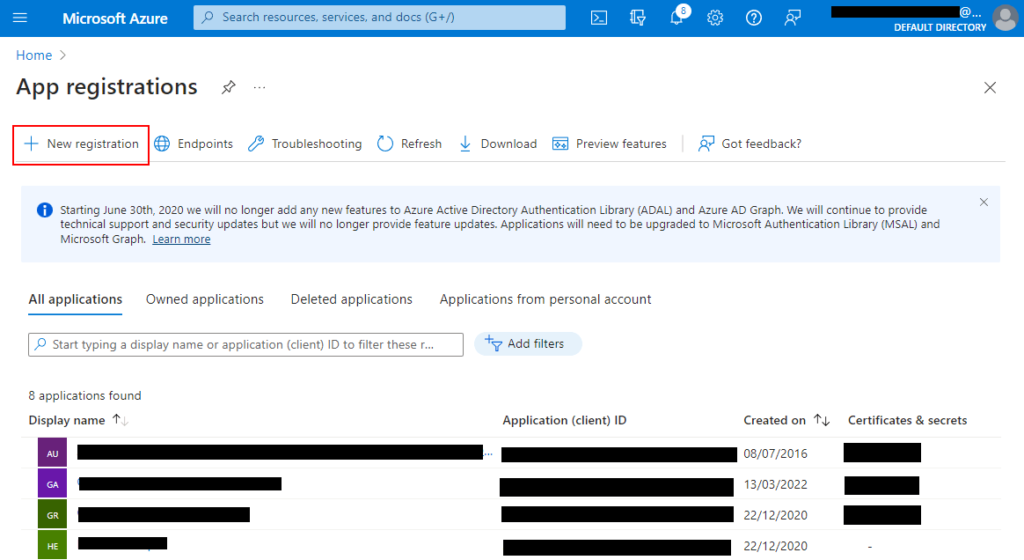
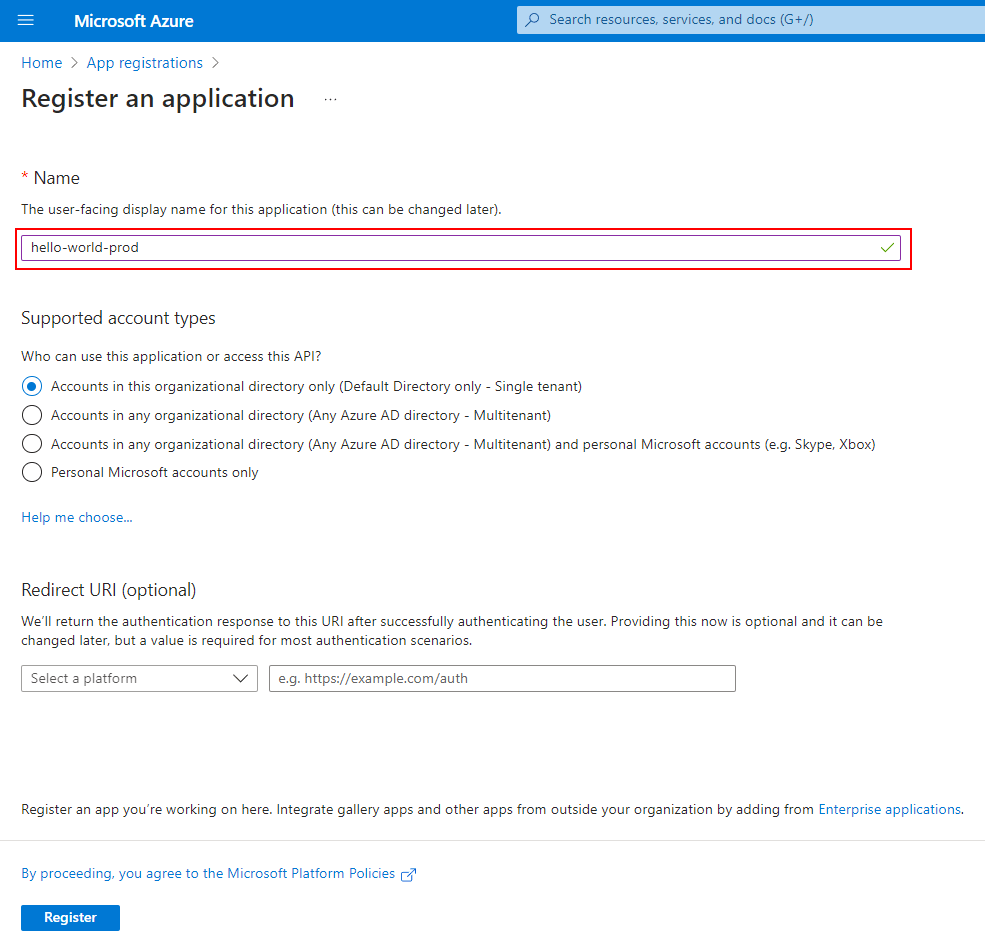
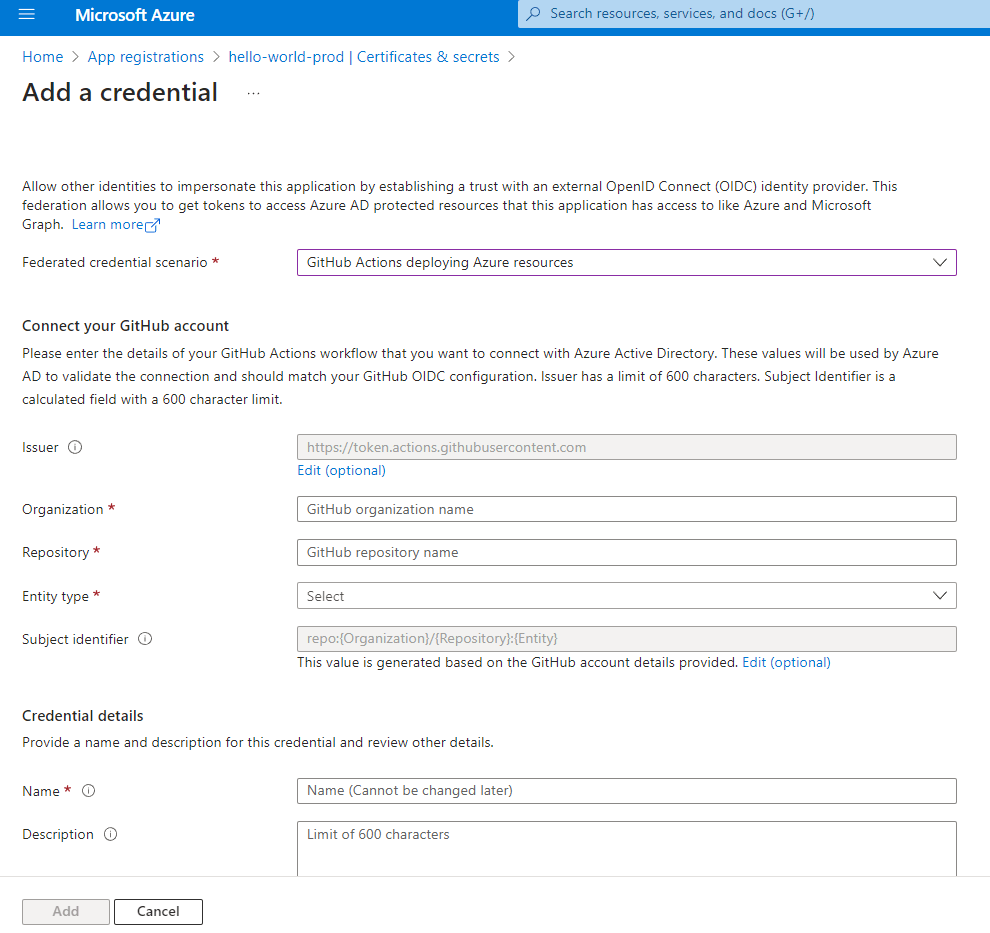
2. Create a Federated Credential for the App Registration
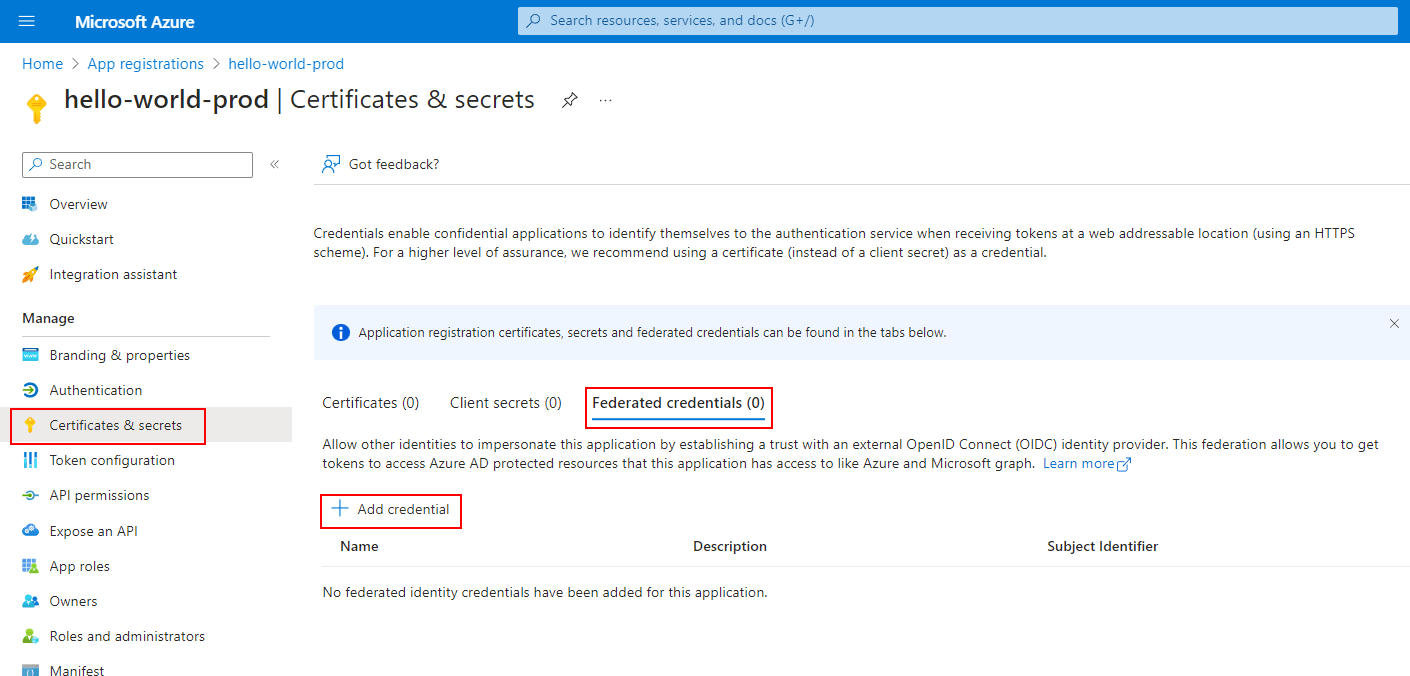
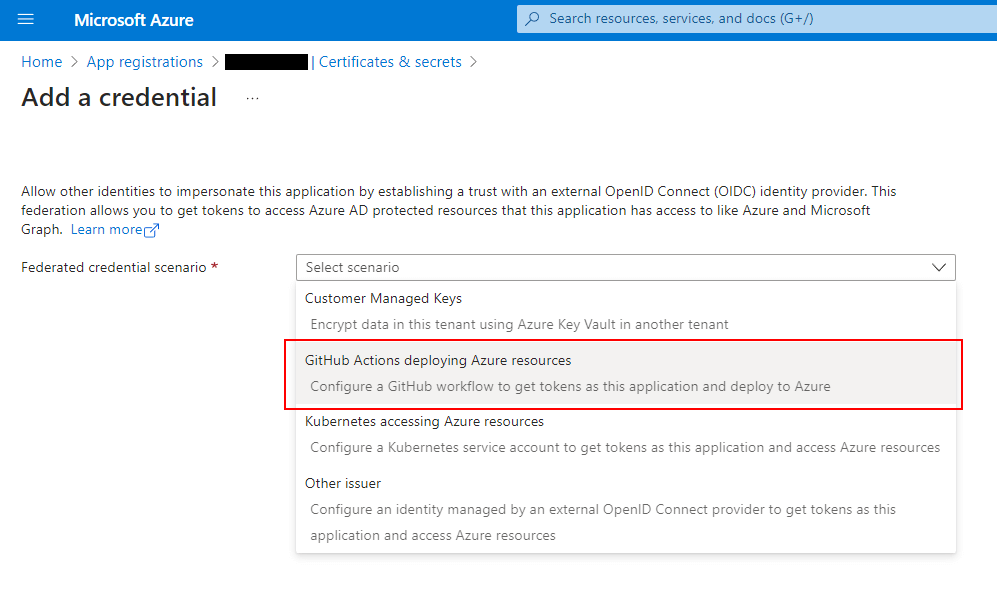
Here we’ll need to provide the details to our GitHub account and repository:
- Organization: This is your GitHub account name
- Repository: Name of your GitHub repository
- Entity Type: Defines the scope where the OIDC access token can be applied, depending on how the GitHub Action workflow is executed. I’d generally recommend using the ‘Environment’ option, which will require a separate app registration for each ‘Environment’ within your GitHub repo.
- Credentials: It’s worth putting something meaningful here such as the application and environment details.
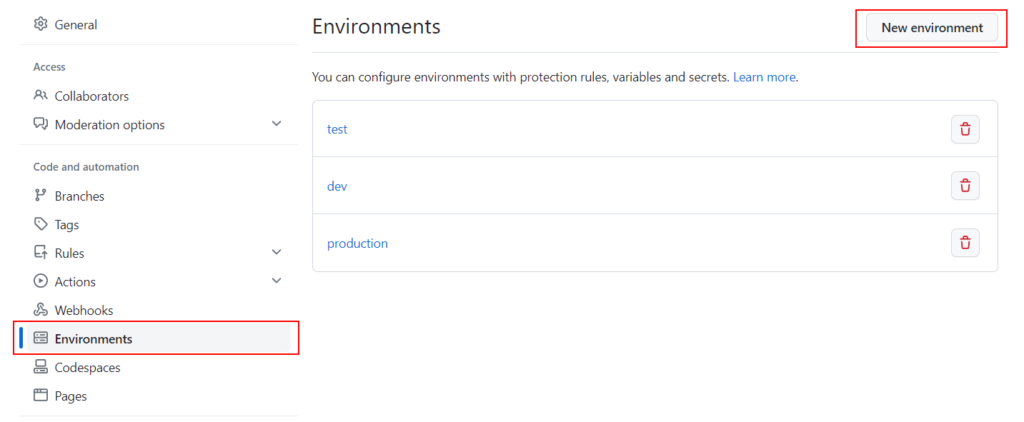
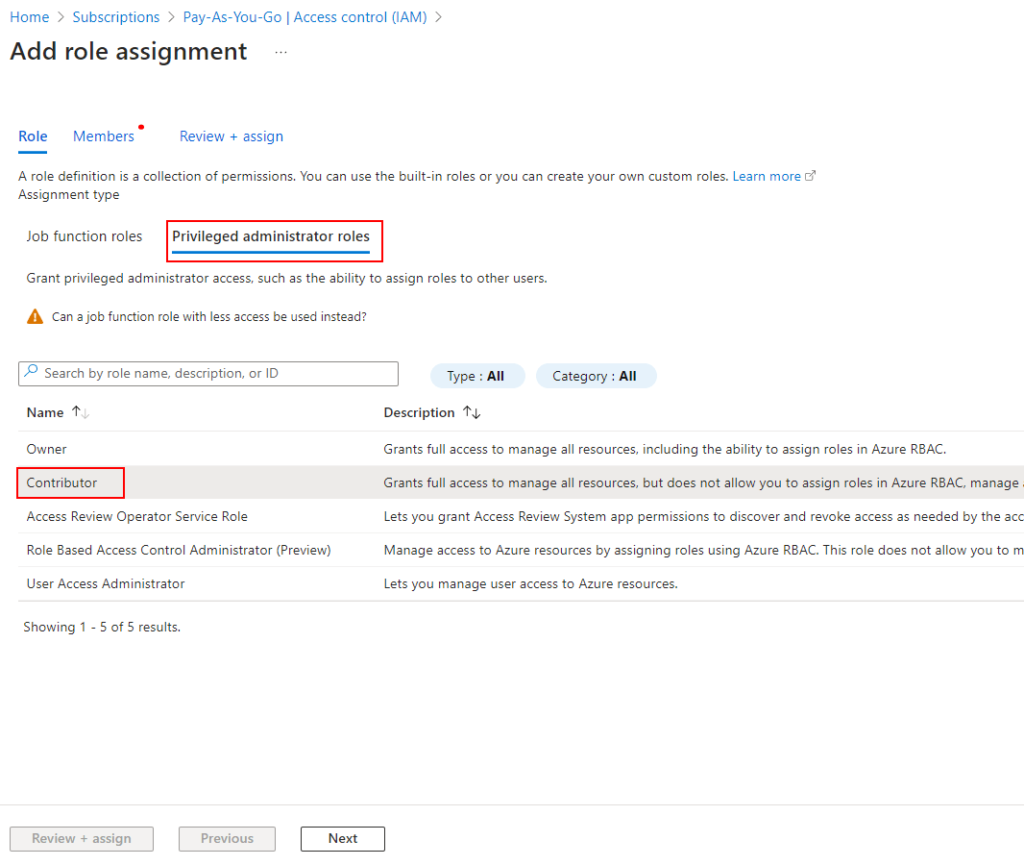
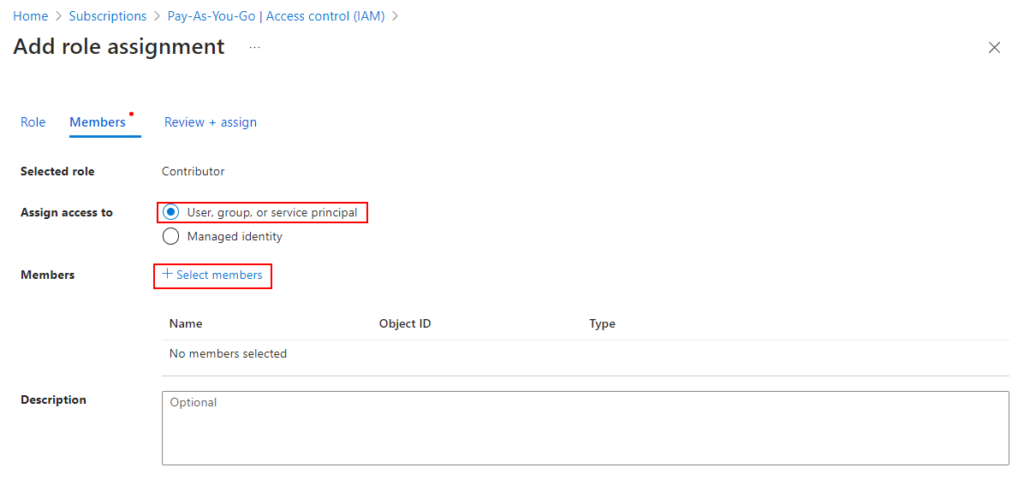
3. Now we need to give our App Registration access to perform deployments. Navigate to SUBSCRIPTION > ACCESS CONTROL (IAM) and grant the ‘CONTRIBUTOR’ to the App Registration we created. You may also need to grant the ‘USER ACCESS ADMINISTRATOR’ role if your GitHub Actions workflow will also manage access to your Azure resources.
5. Now it’s time to start configuring our GitHub Actions workflow. First, we’ll need to grab the following details from Azure:
- Client ID – taken from the Azure App Registration we have just created
- Tenant ID – taken from the Azure App Registration we have just created
- Subscription ID – Your Azure Subscription ID in the Subscriptions
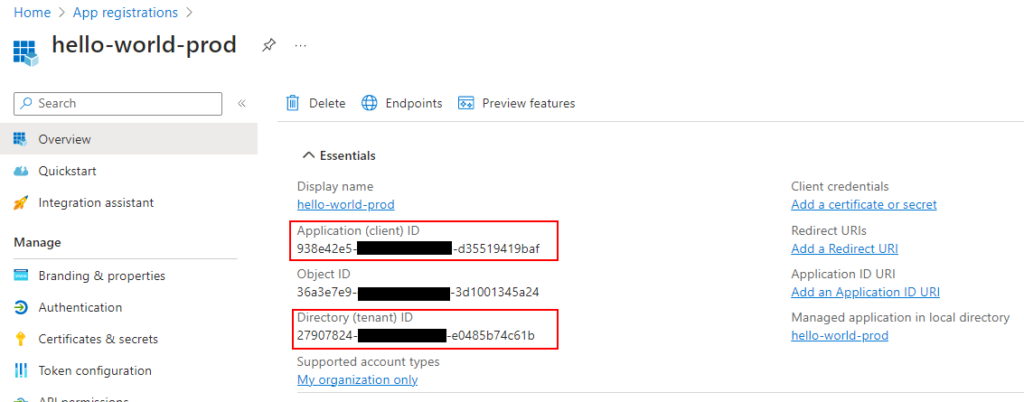

6. Now we’ll need to securely store these details in GitHub. Create the following Secrets in GitHub (it doesn’t particularly matter which hierarchy level you create these secrets at):
- AZURE_CLIENT_ID – Containing the Azure App Registration Client ID we previously obtained
- AZURE_TENANT_ID – Containing the Azure App Registration Tenant ID we previously obtained
- AZURE_SUBSCRIPTION_ID – Containing the Azure App Registration Subscription ID we previously obtained
7. Add the following to your GitHub Actions workflow script to give it the necessary permissions to create the ODIC token request:
permissions:
  id-token: write   # required for requesting the JWT
  contents: read    # required for actions/checkout
And, we also need to do the following to authenticate with Azure using OIDC in our GitHub Actions workflow. You’ll notice that we are referencing the GitHub Secrets that we previously created:
# Authenticate with Azure using OIDC
       - name: 'Login to Azure'
         uses: azure/login@v1
         with:
           client-id: ${{ secrets.AZURE_CLIENT_ID }}
           tenant-id: ${{ secrets.AZURE_TENANT_ID }}
           subscription-id: ${{ secrets.AZURE_SUBSCRIPTION_ID }}
           enable-AzPSSession: true
For example:
name: deploy-app

on:
  # Run workflow manually
  workflow_dispatch:

env:
  DOTNET_VERSION: '6.0.x'

# permissions for Azure OIDC auth
permissions:
  id-token: write   # required for requesting the JWT
  contents: read    # required for actions/checkout

jobs:
    deploy-app:
      runs-on: ubuntu-latest

      # Authenticate with Azure using OIDC
      - name: 'Login to Azure'
        uses: azure/login@v1
        with:
          client-id: ${{ secrets.AZURE_CLIENT_ID }}
          tenant-id: ${{ secrets.AZURE_TENANT_ID }}
          subscription-id: ${{ secrets.AZURE_SUBSCRIPTION_ID }}
          enable-AzPSSession: true

    ...
That’s it! We’re all done now. We can now run our GitHub Actions workflow which will authenticate with Azure using OIDC.
Final Thoughts
GitHub Actions is a very powerful platform, that is ever-changing and improving all the time.
OIDC is the preferred approach going forward for authenticating with Azure from within GitHub Actions. Yes, there are a few steps to configure it initially, however once completed, it is largely set-and-forget.
I hope you’ve learned a few things from this article. If you have any tips or wish to share your experience, feel free to mention it below in the comments to help others out there.
Happy coding! 🙂
- Solved: Filename too long for Git - 18th April 2025
- GitHub Actions Exam Study Guide - 14th February 2025
- Solved: Build Errors Not Showing in VS 2022 - 21st November 2024
